Dr. Terry M. Trier
I find few things more satisfying in life than whittling wood. There is a certain kind of distinct pleasure you get when a sharp knife meets wood. The end result doesn’t have to be anything special to appreciate this subtle joy of carving. Whittling a sharp point on a stick can be very satisfying and I think it appeals to an instinct that extends back to an ancient tool-making past when a sharp stick may have been critical for survival.
When I was a kid growing up on a farm, most boys carried a knife to school and usually sharpened their own pencils. Getting a nice smooth point on a pencil was a matter of pride for most of us. It’s a sad comment on today’s society that kids carrying knives to school are now considered criminals.
During my youth, lots of kids made their own toys. I can’t recall how many toy pistols and rifles I made but I’m sure it numbered in the dozens. The Tommy gun was my favorite to make out of a one-by-four board. I usually could crank one out pretty quickly using a hand saw and a bench grinder and finished up with my pocket knife to smooth out the edges. I have to admit I was pretty proud of those puppies. I think I had more fun making them than playing with them. And if I lost one, no big deal, I just made another. I could usually keep the whole neighborhood supplied with arms, which–in that rural community–consisted of two other kids, both of which lived over a half mile away! I was probably around six then but one of the cool things about growing up on a farm is that you learned to work with your hands early on because there was just a lot of work to go around. So puttering around in the garage and barn with your dad’s tools at a fairly young age was pretty typical for a farm kid in those days.
When I was eleven I joined the Boy Scouts and it was here that I discovered the world of “old timey” whittling. We were a rag-tag group of rural scouts but we sure did a lot of stuff. We built toboggans, made canvas kayaks, camped out in the dead of winter, and had primitive “cave man” campouts where you learned to make shelters from the materials at hand and cook in the coals of a fire. Our fearless scoutmaster was a retired Army sergeant who, with his tall lean frame, Smokey-the-Bear hat, wire rimmed glasses, and big red moustache, looked like he stepped off the cover of Boy’s Life magazine. He was a fantastic woodsman who loved to camp and our little group had more days camping every year than any other troop in the state. And it was amazing what he could do with a pocket knife! More than one of his neckerchief slides ended up featured in Boy’s Life. My favorite was the donkey with the bouncing head. But the wood carvings by the old scoutmaster I admired most were the chains and balls-in-cages that he carved, each whittled from a single piece of wood. There always seemed to be some kind of magic associated with carving these and to this day, the most common comment I receive when I show a novice a ball-in-cage I carved is “How’d you get that ball in there?”
The truth is that there is no magic involved in whittling the caged ball although it often feels like it after you’re done. I’m always fascinated with the product after I finish, even if it’s the simplest of caged balls. Nor does whittling the ball and cage require any great artistic talent. Just about anyone can learn to carve one. The main ingredients are some good, straight-grained carving wood, a sharp knife, and lots and lots of patience. And it’s the third requirement that is often lacking and leads to lack of success. The important thing to remember is that the process of carving can be just as rewarding as seeing the product. If it feels like work, then you probably don’t have the makin’s of a good whittler. Whittling is a time for focused relaxation, where you can enjoy the feel of carving wood and the sounds of a sharp knife at work. It’s about as good a therapy to counteract the rat race of the modern world as I can think of. Enjoy the process and the product will emerge effortlessly.
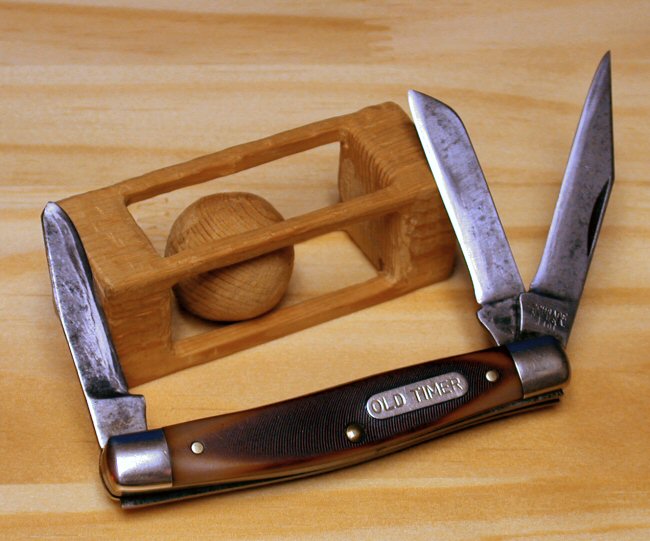
The first step in any whittling endeavor is selecting an appropriate knife. For carving a caged ball, a knife with two or more blade types is usually preferred. A medium sized stockman often fits the bill for me and one of my favorites is a Schrade Old Timer Middleman (330T). The thin clip, sheepsfoot and spey blades give a nice assortment to choose from for different whittling tasks and the handle is large enough to be comfortable for most carving. And one of the best features about this knife is the price. You can usually purchase it for around $20. The Middleman I used for this project I purchased over 25 years ago and it’s still going strong. You can spend a lot more for a knife but it won’t make you a better whittler.
 The next step is sharpening. Most pocket knives need extensive reprofiling to be good whittlers. Think thin. Think razor-blade edge. You want to thin that bevel way down so your knife will easily push-cut through wood. The bulk of your whittling will involve push-cutting and not slicing. For this you want a very thin edge that is stropped smooth. Don’t worry about the knife holding an edge. Unless you are carving very hard wood, you should be able to maintain the razor edge for a long time simply by stropping. So once the edge is thinned down, be sure to strop it on a piece of leather to remove the wire edge and polish the remaining edge. A good polishing compound smeared on the leather will help. Lee Valley Tools LTD (www.leevalley.com) sells an excellent leather strop with green honing compound that works well for this but you can go the homemade route as well and get excellent results by gluing an old belt to a piece of wood.

Next is choosing the wood. This is an important step, especially for the novice. I strongly recommend starting with a wood that’s known for its ease of carving. Two of the best are white pine and basswood. If at all possible, buy your wood from a store that specializes in carving wood. This way you usually will be assured of wood that is straight-grained and properly dried.
For this article I chose to carve a caged ball. This is an excellent project for beginners because it’s a lot easier than it looks and it’s a real confidence builder. Not to mention it’s fun!

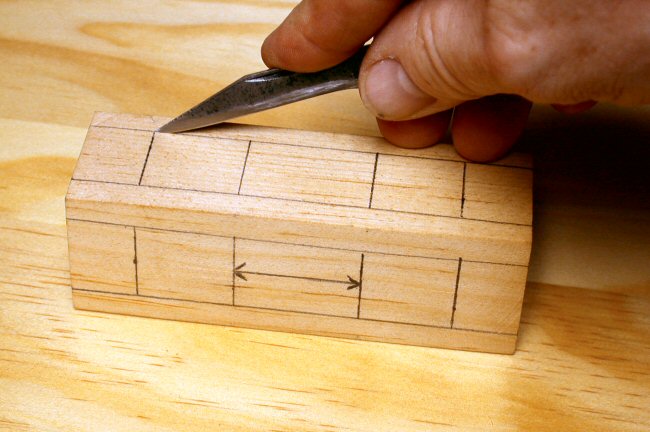
Begin with a square piece of wood. In this instance I used a 1 1/4" square piece of wood around 4 inches long, with the grain running the length of the cage. For this size wood, I made the rails of the cage 1/4" wide. Using a sharp pencil, mark the rails on the block on all four sides. Measure at least ½" in from each end and mark to form the end pieces of the cage. Measure on one end of the block 1/4" in along all sides and mark. Now measure the corner-to-corner distance of the square that was created. This will be the width of the ball. Mark this length on all four sides of the block, centered in the middle of the block. You should now have two windows on each side of the ball section, on each side of the block. You are now ready to begin whittling!
Start by making deep stop-cuts along each window adjacent to the ball section on all four sides. Don’t try to cut in the width of the rails.

Do it in steps and then split out small wedges of wood until all the wood is removed from the window sections.
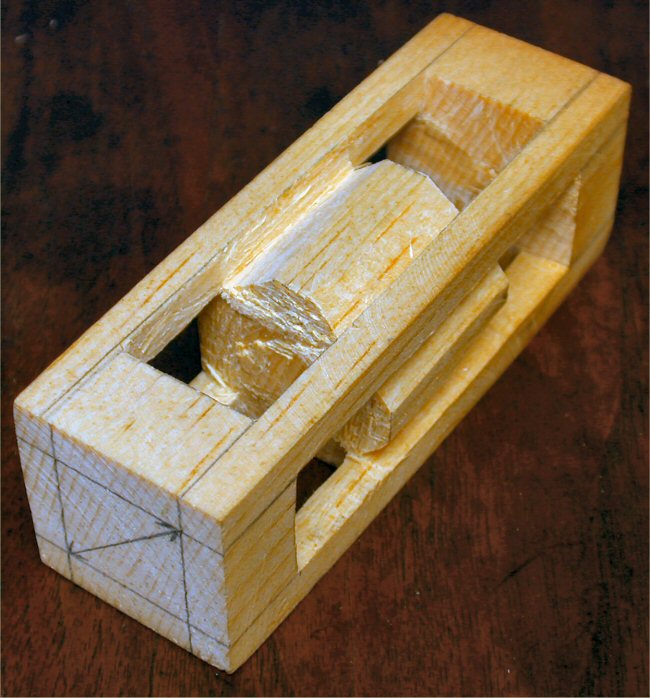
Make the same stop cuts around the ball area, splitting out small wedges of wood as you go, until the cuts meet from each side and the block in the middle slides freely along the rails.
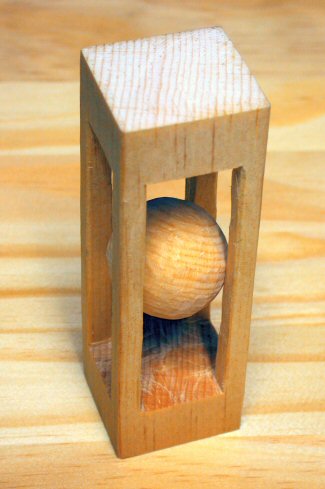
Now start rounding the ball, making tiny cuts on all sides. Remember, patience is a virtue! Once the ball is rounded, you can smooth up the rails but be careful. Don’t remove any more wood than is absolutely necessary or the ball will fall out of the cage!
Congratulations! You have just whittled the classic ball-in-a-cage! To finish, you can seal the wood with some type of oil or acrylic finish. If this has sparked your interest in whittling, you may want to explore further. An excellent resource is E.J. Tangerman’s book, “Whittling and Woodcarving.” It’s a classic, first published in 1936, but still in print. It just proves that whittling is a timeless adventure that will continue to fascinate young and old alike as long as there is fine wood for whittling and a good sharp blade to complete the circle. I should mention that while I was working on this project, I just happened to purchase a new Old Timer Middleman for $16.95, and that included a stone, oil, and a small cloth! What a deal, eh? Maybe someday when my first Old Timer wears out, I’ll get a chance to use it. Happy whittling!
7 comments:
http://www4.gvsu.edu/triert/cache/articles/t2/bic.htm
This article is copyrighted and you do not have the right to publish it. I am in no way associated with this site. Please remove this article immediately.
Thank you,
Terry Trier
Report a Terms of Service violation
http://tinyurl.com/2yqdvd
You know, I've been watching for some really interesting word close by woodworking and topics joint, and I haven't been
able to gather up any until now. Much appreciation for the sake of editorial such a capacious article, and I only wanted to taper off you a line and arrange for you know that I'll definitely
sponsor backside again to brake in sight some more of your stuff. I absolutely find worthwhile the info, and the blog is incredibly
diverting to read. I guess that's the whole! Thanks! Forgive me, my English is not very quality.
xanax anxiety order xanax online review - xanax gg 256 dosage
Lovely poost
Thanks greatt post
Post a Comment